Essential Guide to Types of Finish Nails for Your Projects?
When it comes to woodworking, understanding the "types of finish nails" is crucial. Expert carpenter John Smith emphasizes, "Choosing the right finish nail makes all the difference in your project." The variety of finish nails available can tailor your work to specific needs, enhancing both durability and aesthetics.
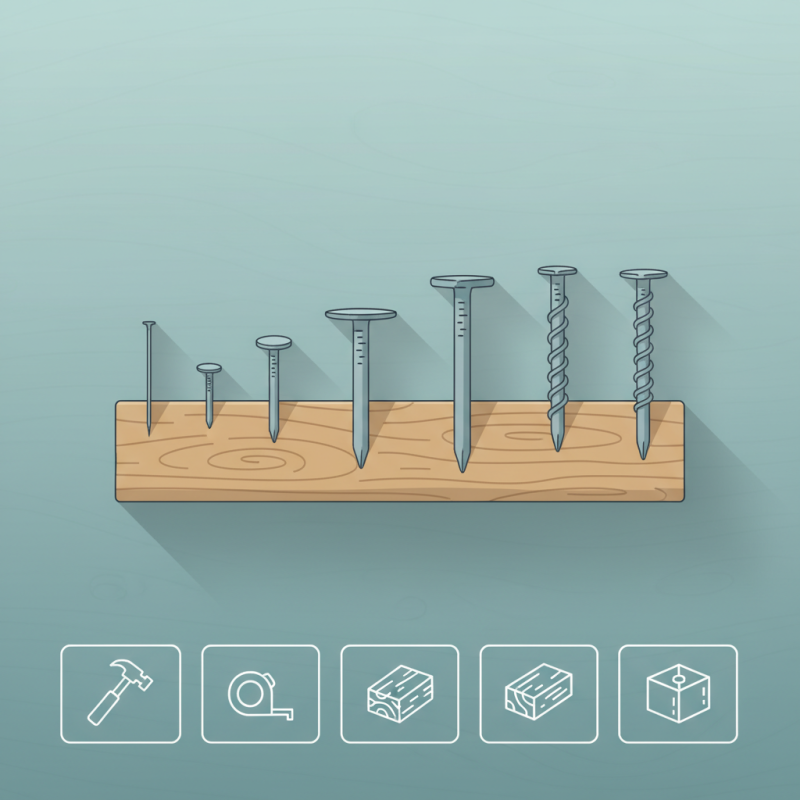
Different types of finish nails, such as brad nails and box nails, serve unique purposes. Each type has distinct features that impact how they perform in various applications. Proper selection can prevent costly mistakes, such as choosing a nail that is too long or short for your materials.
Understanding these nuances is essential for quality craftsmanship. While many rush to start their projects, others may overlook the significance of finish nails. Reflecting on this can lead to better decisions in the future. By taking the time to learn about the types of finish nails, you set the foundation for successful outcomes in your woodworking endeavors.
Understanding Finish Nails: Definition and Purpose
Finish nails are essential for various woodworking projects. They secure trim, moldings, and cabinetry beautifully. Understanding their definition and purpose is crucial for any DIY enthusiast. Finish nails provide a clean look by minimizing holes and preventing splitting in the wood. They allow for secure fastening while maintaining the aesthetic of your project.
When using finish nails, consider the nail size and gauge. A smaller gauge nail works best for delicate work, while thicker nails provide stronger support. Tips: Always pre-drill pilot holes for a clean finish. This technique reduces the chance of splitting the wood. Also, when nailing into hardwood, choose a longer nail for better grip.
Finish nails come in different lengths and head types. The choice affects both durability and visibility. Tips: Use nails with a rounded head for a more natural look. Alternatively, an angled or flat head can provide a stronger bond in certain applications. Pay attention to your project's requirements and use the right finish nails. This ensures both strength and beauty in your carpentry work.
Types of Finish Nails: An Overview of Common Varieties
When selecting finish nails for your projects, it’s essential to understand the common varieties available. Each type has distinct characteristics that cater to different needs. For example, 15-gauge finish nails are thicker and provide more holding power. They work well for heavier moldings and trim work. Conversely, 18-gauge nails are thinner and cause less damage to delicate materials. This makes them an excellent choice for lighter applications.
Aside from gauge, the nail length matters. Longer nails penetrate deeper, ensuring a secure hold. However, overly long nails can split wood. Consider using a nail gun for faster and more consistent results, but remember to practice first. Another common type is the brad nail. These are perfect for attaching smaller trim and come in various lengths. Yet, they may not be ideal for heavy-duty tasks.
Choosing the right finish nails can be tricky. Understanding the materials you’re working with is crucial. It’s also important to appreciate the limitations of each type. Spend time experimenting with several options. With practice, you’ll develop a better feel for what works best for your unique projects. Balancing experience and trial-and-error will guide you toward the right choices.
Choosing the Right Finish Nail for Your Project Needs
When selecting finish nails for your projects, understanding their characteristics is crucial. Finish nails typically range in diameter from 15 to 18 gauge, and their length can vary significantly, from 1 to 3.5 inches. Research indicates that using the appropriate nail type can enhance the durability and appearance of your work. For example, the National Association of Home Builders reports that correctly chosen finish nails can reduce nail pops, which may lead to unsightly imperfections in your finished project.
Consider the material of the finish nails. Common options include steel, stainless steel, and galvanized nails. Steel nails are ideal for interior applications, while stainless steel is preferable for exterior jobs due to its resistance to corrosion. A study from the Journal of Wood Science found that using the right nail material can significantly impact the lifespan of your project. It’s also important to match the nail length to the thickness of your materials to avoid split wood or weak joints.
Over-reliance on a single type of nail can yield subpar results. Unaddressed details may lead to problems down the line. For instance, using nails that are too long can cause damage and negatively affect structural integrity. Thus, exploring various options and understanding their applications will lead to better outcomes in your projects. Always assess your needs and remember that even small choices can cause significant consequences.
Types of Finish Nails for Your Projects
Using Finish Nails: Techniques and Best Practices
When using finish nails, mastering the right techniques is crucial. Ensure your nail gun or hammer is set correctly. This reduces the chance of splitting the wood. Take your time. Rushing can lead to mistakes. Misplaced nails can ruin the appearance of your project.
Proper spacing is key. For most applications, keep at least 12 inches between each nail. This prevents weak spots. When driving nails, hold them securely. Ensure they are countersunk slightly below the surface. This allows for smooth finishes later.
Practice makes perfect. If you experience misfires or bent nails, reflect on your technique. Adjust your grip or the angle of your tool.
Every project provides a learning opportunity. Even seasoned professionals encounter challenges. Embrace the process and keep improving your skills.
Common Mistakes to Avoid When Working with Finish Nails
When working with finish nails, avoiding common mistakes is crucial. Many DIYers often choose inappropriate nail sizes. Selecting a nail that is too long can cause splitting in the wood. Alternatively, using nails that are too short may not provide enough holding power. Be sure to measure carefully before starting your project.
One mistake people often make is failing to consider the material being nailed. Different materials require different nail types. Hardwood, for instance, needs a different approach than softwood. Always choose nails that are designed for the specific materials you're working with.
Tips: Pre-drilling holes can prevent wood from splitting. This technique offers greater control and precision. Also, consider the angle of the nails. Driving them at the correct angle improves stability. Remember, attention to detail makes a significant difference in your final result. Don't overlook these aspects as they can greatly impact the outcome of your work.